- Click the File tab, then click info, then click protect document.
- Click Encrypt with password.
- Then One box will appear and type your password and click OK.
- Then your document will be protected with password.
Showing posts with label Tips and Tricks. Show all posts
Showing posts with label Tips and Tricks. Show all posts
Tuesday, April 5, 2011
How to keep password in MS-Word 2010 file....?
Saturday, May 29, 2010
Upgrade your BIOS
Flash your motherboard BIOS to avail additional features!
With the least amount of expertise and a keen sense for learning, BIOS can be play around with. But, it's safer to know the consequences and how to revert from alterrations before taking the plunge.
Windows Environment
The simplest way to upgrade is the Windows tool. It's specifically developed for motherboards. Most of the manufactures offer it with the motherboard CD.
Friday, May 28, 2010
How to Install Windows 7 from a USB Thumb Drive
Installing Windows 7 directly from a USB thumb drive can be done in a couple of easy steps, thanks to Microsoft’s very own Windows 7 USB/DVD Download Tool.
- Some of the netbooks are sold without any form of DVD drive. What if your pre-installed Windows 7 installation is messed up? What if your netbook came with Windows XP and you want to upgrade? Now, you can setup Windows 7 from a USB Drive!
- Power users regularly install operating systems on more than one machine. Installing from a USB Drive is much faster than from an old DVD drive.
- USB drive is more smaller to practical than a DVD, to carry around.
Thursday, May 27, 2010
Avoid Damage to Optical Media
Deep Scratches, dirt and finger prints are some of the problems we face with regard to optical media. Have a look at the some of the tips which will help you extend the life span of your CDs, DVDs and so on.
- Wipe the disc in a radial fashion with a soft lint-free cloth. Start stroking from the center of the disc towards the circumference (outer circle). This will avoid scratches running parallel to the tracks while minimizing chances of damage.
Sunday, January 31, 2010
Reach warp speeds with Turbo Mode!
How Tune Up Turbo Mode works
The more you ask your PC to do, the slower it gets. Your new PC game stops and starts. Your big presentation makes your computer crash every time.
The more you ask your PC to do, the slower it gets. Your new PC game stops and starts. Your big presentation makes your computer crash every time.
Monday, December 14, 2009
IMPORTING ESSENTIAL FILES

Follow the given steps to restore a back-up of Outlook contacts · First click on Start button, go to Program then click on Outlook to run the outlook application.
Monday, December 7, 2009
Protect yourself against resource-hungry background processes!
What is Tune Up Live Optimization and what makes it so unique?
Tune Up Live Optimization is a dynamic resource administration tool that focuses processor

performance on the programs you are actually using. This means that Tune Up Utilities – Version 2010 runs a real-time analysis of the programs you are currently using and bundles the main performance of your PC for these programs. Background processes that eat up resources are automatically given lower priority.
Conclusion:
The intelligent resource assignment in the new Live Optimization tool from TuneUp Utilities – Version 2010 helps your computer set the right priorities. Under Windows XP™, Windows Vista™ and, of course, Windows 7™. Whether its a new netbook, an aging laptop, or your normal PC, Live Optimization can guarantee you a Eureka moment.
Friday, September 18, 2009
Here is 7 great tips and tricks to optimize your netbook
 1. Use a lightweight Media Player and codec pack to play all your favorite videos and music (e.g. Cole2k Codec Pack and Media Player Classic HC 1.2).
2. Uninstall programs you no longer use, especially trial software, as these can clutter up the drive. TuneUp Uninstall Manager of our TuneUp Utilities 2009 helps you immensely with that, because it tells you which programs you regularly use and which you don't.
3. Defrag the hard drive to better manage your data and keep your computer running fast. We recommend using TuneUp Utilities 2009 to safely and consistently do this on a regular basis.
4. Reduce the user interface of Internet Explorer, Firefox, and other Web browsers to better utilize the smaller “real estate” on your netbook. Right-click on the upper menu bar of your browser and uncheck unnecessary menu items.
5. Go back to the classic Windows look and feel. Animations can hinder the system's performance. To do that, right-click on your desktop and go to “Properties” (XP) or “Personalize” (Vista). Under the “Design” entry, select the classic design and hit “OK.”
6. Disable unnecessary devices, such as Bluetooth, FireWire, and Wi-Fi, to save battery power.
7. Don't run too many applications at the same time. Multitasking is better suited for a laptop, whereas netbooks are designed for basic use such as word processing and simple Web browsing.
Wednesday, September 16, 2009
PUT CLIP ART-CLIPPING IT UP
 If you want to put clip art and you don't konow how to put is here
STEP1: Open an existing microsoft office powerpoint.Select on the standard toolbar at the top of your document, and then click from the drop-down menu.
 STEP 2: Move your mouse to in the dialog box. Click on the clip-art that you like.
STEP 3: Use the function in the Clipart Task Pane on the right side of your slide to find a catalog of clip art options. It will produce relevant images as the result found in the image library.
 STEP 4: Browse through the clip art. To insert an image, click the arrow on the right of the picture and select from the menu of options. After adding clip art to your slide, manipulate the size and placement of the image.
Monday, September 14, 2009
HOW TO CHANGE DATE AND TIME


Click on the time that is displayed in the task bar.This will bring up the Date and Time Properties box.You can also right-click on the time by clicking on the `Adjust Date and Time' menu option.Highlight (Hour,Minute and Second.) Then change (Day, Month and Year.)Don't forget to press apply button.
Friday, July 31, 2009
Changes to menu


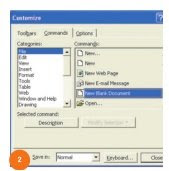
 How to add or remove items from the menus?It is the user's call what all item is included in the menu. Keeping all the icons that are regularly used is a rather wise decision.
Here's how: To remove menu items: · Choose Toolbars from the View menu.· Select Customise.· Once the Customise dia log box is open you can drag unwanted items off of any of the menus.To add a command to a menu: · Click on the Commands tab.· Select a Category, and then drag the command you want onto any of the menus. (Note: To restore a menu to its original set up, follow the steps above, but right-click on the menu you want to restore and select Reset.)
Monday, July 27, 2009
Tips for Those Usually Useless Function Keys From F1 to F11
How many people actually use their function keys -- you know, those little buttons on your keyboard that go from F1 to F12? But here is only F1 to F11 keys.
So here are some suggestions for functionalities that people would actually use:
F1: Blocks the Wi-Fi signal that Mr.-Sit-at-the-Best-Seat-at-Starbucks-for-Nine-Hours is using, forcing him to shut down and vacate the premises.
F2: Sends a nasty e-mail to Microsoft execs' personal e-mail box relaying that a Windows bug is about to crash your system and you really appreciate the inconvenience -- again (this could work for any vendor, of course).
F3: Deletes embarrassing Facebook photos of you posted by high school classmates.
F4: Brings up an image of Megan Fox in "Transformers."
F5: Quickly quarantines any guilt-ridden e-mail from your mother and sends automated "Out of Office / Can't Respond for 3 Weeks / Do Not Contact" response.
F6: (See F4) You were just on a website of "questionable" integrity and you might have been infected with spyware-Automatically kills anything on your machine that resembles malware.
F7: (For IT people only) Sends a reply to those less-than-savvy users who send indiscriminate barrages of help-desk e-mails: "Hit restart, genius."
F8: Sets your PC ablaze because it's 8 years old, still running Windows 95 and you just can't take it anymore.
F9: Sends a digital shockwave to the spammer's keyboard who just filled up your inbox with links to purported photos of Megan Fox in "Transformers."
F10: Kills any Apple DRM feature.
F11: Crashes Twitter feed of any of your followers who are still tweeting about Michael Jackson.
Tuesday, July 21, 2009
Set the Search Screen to the Classic Look
When I first saw the default search pane in Windows XP, my instinct was to return it to its classic look; that puppy had to go. Of course, I later discovered that a doggie door is built into the applet. Click "Change preferences" then "Without an animated screen character." If you'd rather give it a bare-bones "Windows 2000" look and feel, fire up your Registry editor and navigate to:
HKEY_CURRENT_USER \ Software \ Microsoft \ Windows \ CurrentVersion \ Explorer \ CabinetState.
You may need to create a new string value labeled "Use Search Asst" and set it to "no".
HKEY_CURRENT_USER \ Software \ Microsoft \ Windows \ CurrentVersion \ Explorer \ CabinetState.
You may need to create a new string value labeled "Use Search Asst" and set it to "no".
Monday, July 20, 2009
How to Remove Windows XP's Messenger
heoretically, you can get rid of it (as well as a few other things). Windows 2000 power users should already be familiar with this tweak.
Fire up the Windows Explorer and navigate your way to the %SYSTEMROOT% \ INF folder. What the heck is that thingy with the percentage signs? It's a variable. For most people, %SYSTEMROOT% is C:\Windows. For others, it may be E:\WinXP. Get it? Okay, on with the hack! In the INF folder, open sysoc.inf (but not before making a BACKUP copy first). Before your eyes glaze over, look for the line containing "msmsgs" in it. Near the end of that particular line, you'll notice that the word "hide" is not so hidden. Go ahead and delete "hide" (so that the flanking commas are left sitting next to one another). Save the file and close it. Now, open the Add and Remove Programs applet in the Control Panel. Click the Add / Remove Windows Components icon. You should see "Windows Messenger" in that list. Remove the checkmark from its box, and you should be set. NOTE: there are other hidden system components in that sysoc.inf file, too. Remove "hide" and the subsequent programs at your own risk.
Fire up the Windows Explorer and navigate your way to the %SYSTEMROOT% \ INF folder. What the heck is that thingy with the percentage signs? It's a variable. For most people, %SYSTEMROOT% is C:\Windows. For others, it may be E:\WinXP. Get it? Okay, on with the hack! In the INF folder, open sysoc.inf (but not before making a BACKUP copy first). Before your eyes glaze over, look for the line containing "msmsgs" in it. Near the end of that particular line, you'll notice that the word "hide" is not so hidden. Go ahead and delete "hide" (so that the flanking commas are left sitting next to one another). Save the file and close it. Now, open the Add and Remove Programs applet in the Control Panel. Click the Add / Remove Windows Components icon. You should see "Windows Messenger" in that list. Remove the checkmark from its box, and you should be set. NOTE: there are other hidden system components in that sysoc.inf file, too. Remove "hide" and the subsequent programs at your own risk.
Monday, July 13, 2009
Document protection


When there are more than one person working on the same document the tracked changes feature can also be used to enable document W protection. By doing this reviewers will be able to edit the document, but they will not be able to turn off Track Changes and they will not be able to accept or reject changes
Here is how • Complete the first draft and save it
• Choose Protect Docu- mentfrom the Toolsmenu
• Under Protect document for select the Tracked changes radio button
• Enter a password (you will be prompted to confirm the password)
• The Track Changes feature will be enabled automatically
(Note:Remember the pass- word. There is no way to unlock the document if without the password).
Monday, March 2, 2009
Tune up utility 2009
The fastest Windows of all time in just five minutes!
Part 1: Switch off annoying background tasks

Part 1: Switch off annoying background tasks
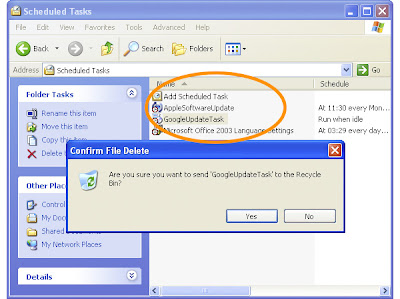
Immediately after logging on to the computer, Windows starts so-called "Scheduled Tasks" which are frequently not needed at all. This costs time and processing power. Decide for yourself which ones you need, and simply switch off the unnecessary tasks. |

| How it works with Windows XP |
| Click “Start”, “Control Panel”, and “Scheduled Tasks.” | |
| Here you will see an overview of all Scheduled Tasks which start either immediately after logging on or at a particular time. Simply delete tasks which are not required! Example: |

| |
|

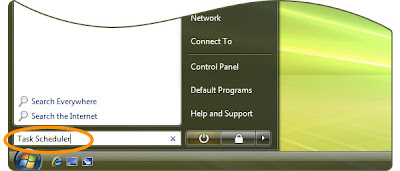
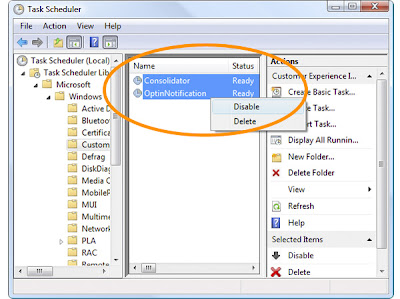
| In the list of results, simply click “Task Scheduler” and then “Continue.” Now double-click “Task Scheduler”, “Microsoft”, and “Windows.” You can now decide which of these tasks you want to switch off without having to think twice about it. | |
| First of all, click “Customer Experience Improvement Program” and select all entries visible on the right-hand side: |

| |
| |||||||||||||||||
|
Subscribe to:
Posts (Atom)